Showing posts with label DIY. Show all posts

Saturday, October 20, 2012

DIY Sunday: Asking Your Bridesmaids

Instead of a phone call or email asking my girlfriends to be my bridesmaids, I decided to add a more personal touch. Here are my supplies:


I spray painted wooden letters in each of my bridesmaids first initials and glued them to the top of the ring boxes.

I put the labels on the front of the boxes.

 My own rings to pop the question

I placed the ring pops into the candleholders and placed them in the boxes. I then found personal pictures of me with each bridesmaid and glued it to the inside of the lid. 

The finished product!


Thursday, October 4, 2012

Does it Really Matter Where You Sit?

From what I've heard and read, doing a seating chart for your reception is a lot harder than it seems. That aunt can't stand that uncle, so they can't sit together. Those cousins don't get along with each other so they have to be sat at different tables. That's where the seating chart and place cards come in. Place cards have evolved from folded pieces of paper to creative favors that guests don't want to discard at the end of the night. I've found some awesome place card inspiration from Martha Stewart Weddings and Oh So Beautiful Paper.

Skeleton keys with satin ribbon

Seating assignment in a bottle.
I like this idea for a beach-themed wedding.

Pinwheel place cards. Cute for a spring wedding.

Vintage typewriter keys. I love this idea for a vintage wedding.

My favorite idea I found. Lucite place cards hung to look like a mobile.
Guests can take their cards as a favor.

Find old pictures of each guest and use it as their place card.
This idea would take a lot of time and effort,
so it may be best for a smaller wedding.

Greet guests with a cocktail and their seating assignment.


Tuesday, October 2, 2012

Themed Tuesdays

This week's Themed Tuesday is post is about travel-themed weddings. This theme is great for couples who have jobs that require them to travel, or for couples who just enjoy jet-setting around the world. 

Invitation and RSVP card

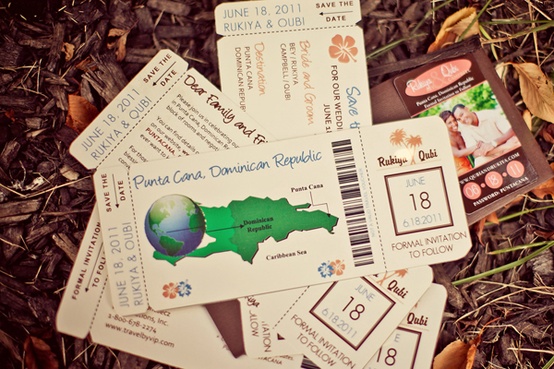
Adorable boarding pass Save the Dates

Luggage tag Save the Dates

Seating chart map of the world


Suitcase wedding cake!


Cute idea. Paper airplane place cards.

Passport wedding programs.

(images from Pinterest)

Monday, October 1, 2012

Reception Fun

I always thought that when you went to a wedding reception you had dinner, danced a lot, took advantage of the open bar, signed the guest book, and listened to a bunch of drunken toasts. Apparently there are a ton of other things that you can have at your reception to make sure your guests have fun. Pinterest, Style Me Pretty, and DIY Bride have posted some awesome ideas for receptions.

Put these coloring kits at tables where kids are sitting.
Ask them to make a card for the bride and groom.
This is a good idea to keep them from getting
bored during the toasts and speeches.
A s'mores bar for a winter wedding, of course.
Photobooths are the most popular trend at weddings today.
Who Wears the Cake?
Whoever has more money in their glass gets a face full of cake.
You can use the money as extra cash for your honeymoon,
or if you're feeling philanthropic,
you can donate the money to a charity of your choice.
Cute photo idea that guests can do throughout the night.
Each bottle represents a year.
Guests write notes and slip them in whichever bottle they want.
The couple opens the bottle for that anniversary.
If you're an Instagram addict like me, this is an awesome idea.
A Wish Jar.
Guests write and sign wishes and give advice to the couple.

DIY Sunday

I got tied up with some other important matters yesterday, so I wasn't able to post my wedding DIY for this Sunday. I love this idea, so instead of waiting till next Sunday to write it, I'm just going to post a belated entry.

This week's DIY comes from Ruffled. This is an awesome favor for a winter wedding (which my regular readers should know I'm begging for). If I did this project, I would change a couple of the elements, but the general idea would be the same.

What's the one thing you crave when you're sitting in front of a fireplace on a cold winter night watching a movie? I guess you could say a few things here, but the answer I'm looking for is hot chocolate. I have a ridiculous sweet tooth, so hot chocolate is a staple for me around the holidays. The writers at Ruffled have designed a really simple, sophisticated version of a hot chocolate wedding favor.

What you’ll need:
-12″ Disposable Decorating Bags (200)
- Chocolate powder (from Costco or Sam’s club)
- 75 teeny, tiny hair ties (x2)
- Marshmallows bags (x4)
- Twine (x1)
- Favor tags


Instructions:
Step 1: Cut decorating bags around 6.5″
Step 2: Fill bag with 2 tablespoons (or whatever your chocolate powder suggests) with chocolate.
Step 3: Use the teeny, tiny hair tie to close off the chocolate. 
(You may need to cut the access bag after tying it off. The picture below, for example, should be cut so there’s just about a 1/2 inch of bag showing after the hair tie.)
Step 4: Insert chocolate filled cone into another decorating bag; make sure seams line up.
Step 5: Pour 1/4 cup of marshmellows into decorating bag on top of the chocolate cone.
Step 6: Tie a piece of ribbon, yarn, or string above the marshmallows. You need to make this tight so the marshmallows don’t dry out. I tied it into two knots.
Step 7: After string is secure around bag, add your favor tag and tie it into a pretty bow.
Step 8: Repeat as many times as necessary.


The finished product
Since this could seem like a really tedious and boring task to do by yourself, you can enlist your bridesmaids to help. Make a night out of it and invite them over for wine and girl talk, and form an assembly line to get it done as quickly as possible. You probably won't even realize how many you can get done in one night.


Thursday, September 27, 2012

VIPS #2

If you don't know what VIPS means, refer to this post. This week's VIPS is one of the most informative wedding planning sites I've looked at. The Knot should be one of the first websites a girl goes to when she gets engaged. Not only is it a great resource for planning your wedding, but it's a great place to look when you just want to find inspiration from other weddings.


One of my favorite features of The Knot is their "Just Engaged"section. It gives a list of the 10 things you need to do first after your groom-to-be pops the question. Items on the list include picking a date, setting a budget, and getting engagement pictures taken.  


Another great section is The Knot community. It's a series of message boards where brides from all over the country can post anything from pictures, to suggestions, to reviews. The boards can also be viewed according to geographic location, so it's easy to find suggestions on local vendors or venues. 


The Knot has an amazing library of images that you can view for inspiration. They have over 35,000 that are sorted by wedding color, style, season, or even flower so that you can narrow down your search and find what you're looking for without looking through thousands of pictures. 


There are a ton of other features that I could write about, but that would just be tedious and would spoil the fun. Once we decide to actually start planning and looking around at different options, The Knot will definitely be one of, if not the most, useful site for me.

(all images from theknot.com)


Tuesday, September 25, 2012

Themed Tuesdays

Tuesdays are going to be all about themed wedding ideas. Before getting engaged, anytime I heard about a themed wedding, I pictured a corny Under the Sea theme with hors d'oeuvres being served off of seashell shaped plates and awful sea green mermaid-cut bridesmaid dresses. After a little bit of reading and researching, I've found that themed weddings aren't nearly that terrible. 

This week's post looks at vintage weddings. There's a fine line between a great touch of vintage and a 20's-themed halloween party. I've found some gorgeous weddings on Style Me Pretty that had the perfect hint of nostalgia, without compromising the couples' own individual styles. 

While a vintage wedding may not be for me, I definitely have a great appreciation for a well done themed wedding. I don't find them any less beautiful than a non-themed wedding or any other wedding, for that matter. What's most important is the bride and groom sharing their love for one another with their family and friends. Ew, that was too corny for me. I shouldn't write these posts before I've had my morning coffee. Enjoy your vintage inspiration below.


Peacock feathers, hydrangeas, and old postcards give this program table a great vintage feel.

The pearls and fishnet veil are the perfect touch of old glamour
without looking too kitschy.

Vintage-style stemware, cutlery, and plates with simple vases to display the flowers.

I love the peacock feather and vintage font on this drink menu. 


(Images from Style Me Pretty)

Sunday, September 23, 2012

DIY Sunday

I'm going to dedicate Sunday posts to creative DIY ideas that I find. This Sunday's DIY comes from mydiyweddingday.com via wedding and event planner Angela from Oh So Joyous. I'm not sure how much money this idea would actually save you, since the materials used for this project can be pretty expensive, but for craftier people, this idea is really cute.

Thank you cards are (hopefully) one of the last expenses a couple needs to worry about for their big day. Angela came up with an awesome DIY thank you card that looks very professional and polished, but adds that personal touch from the newlyweds.


(Taken from mydiyweddingday.com)
"This thank you pack includes an embossed card and the couple’s favourite wedding photos all wrapped in a pretty little pocket folder and finished off with a ribbon."

    What you will need:
  • watermark ink or embossing ink
  • ink of your colour choice (I used black)
  • thermal embossing powder of your colour choice (I used gold)
  • rubber thank you stamp
  • rubber stamp of your choice for front of card (I used a custom monogram stamp)
  • heat gun
  • cards and envelopes
  • ribbon
  • luggage tags
  • pocket folders
  • a selection of your favorite wedding photos
    Here's what to do:
  1. Using a thank you stamp, stamp the luggage tags with the regular ink and put aside.
  2. Press the rubber stamp on the watermark ink and stamp the image on the card by pressing down firmly and removing the stamp quickly.
  3. Shake the thermal embossing powder over the image until it is completely covered. To remove the excess powder tap the card over some paper and then empty this back into the thermal embossing powder container. Make sure the card has no flecks of powder by brushing them off.
  4. Turn on the heat tool and melt the powder this may take a few seconds.
  5. Once you have filled in the cards with your note and enveloped them you can insert the card and photographs into the pocket folder and seal it.
  6. Put the ribbon through the luggage tag and tie it around the pocket folder, finish it off with a tie of your choice and voila!
You can check out mydiyweddingday.com for a picture tutorial of how to put the cards together, but here's a picture of the finished product from the website.


Thursday, September 20, 2012

STD (Not What You Think)

The Save the Date (STD) is a couple's first introduction to the wedding guests who haven't had a chance to meet your bride/groom-to-be. To me, the STD is extremely important. I believe that it should coincide with the theme that you want for your wedding. It sets the tone for the type of wedding your guests can expect.

Most STD invitations that I've found have been very traditional, with one or two cute pictures of the couple looking very much in love, "Save the Date" written in a scripted font, and the wedding date. Don't get me wrong, these are a nice way to tell everyone to clear their schedules for your big day; however, if you're someone who gets at least two Save the Dates a month, they all tend to look  the same. After browsing Pinterest and other wedding planning sites, I've found some adorable Save the Date ideas that will definitely grab your guests' attention and leave them saying "I can't wait to go to this wedding!"


Adorable luggage tag invite for a destination wedding.


This timeline is a cute spin on the traditional engagement picture invite.

I love this idea, especially since my fiancé loves going to the movies.


Last Christmas we played a joke on my mom with a fake lottery ticket, so I know she would find this one funny.
(Sidenote: You can see us pranking her here)


Another cute idea is to send out Save the Date "tickets."


I found this one to be really funny. Right to the point.